

How To Create Gui App In Python
Tkinter is a Python Package for creating GUI applications. Python has a lot of GUI frameworks, but Tkinter is the only framework that's built into the Python standard library. Tkinter has several strengths; it's cross-platform, so the same code works on Windows, macOS, and Linux. Tkinter is lightweight and relatively painless to use compared to other frameworks. This makes it a compelling choice for building GUI applications in Python, especially for applications where a modern shine is unnecessary, and the top priority is to build something that's functional and cross-platform quickly.
To understand Tkinter better, we will create a simple GUI.
Attention geek! Strengthen your foundations with the Python Programming Foundation Course and learn the basics.
To begin with, your interview preparations Enhance your Data Structures concepts with the Python DS Course. And to begin with your Machine Learning Journey, join the Machine Learning - Basic Level Course
Getting Started
1. Import tkinter package and all of its modules.
2. Create a root window. Give the root window a title(using title()) and dimension(using geometry()). All other widgets will be inside the root window.
3. Use mainloop() to call the endless loop of the window. If you forget to call this nothing will appear to the user. The window will wait for any user interaction till we close it.
Example:
Python3
from tkinter import *
root = Tk()
root.title( "Welcome to GeekForGeeks" )
root.geometry( '350x200' )
root.mainloop()
Output:
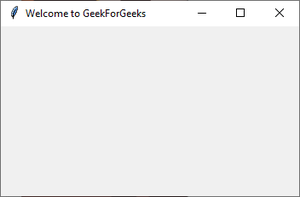
Root Window
4. We'll add a label using the Label Class and change its text configuration as desired. The grid() function is a geometry manager which keeps the label in the desired location inside the window. If no parameters are mentioned by default it will place it in the empty cell; that is 0,0 as that is the first location.
Example:
Python3
from tkinter import *
root = Tk()
root.title( "Welcome to GeekForGeeks" )
root.geometry( '350x200' )
lbl = Label(root, text = "Are you a Geek?" )
lbl.grid()
root.mainloop()
Output:
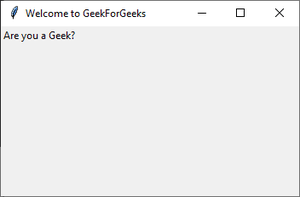
Label inside root window
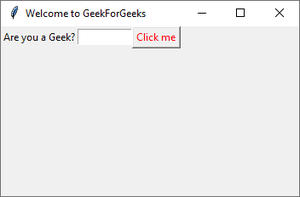
5. Now add a button to the root window. Changing the button configurations gives us a lot of options. In this example we will make the button display a text once it is clicked and also change the color of the text inside the button.
Example:
Python3
from tkinter import *
root = Tk()
root.title( "Welcome to GeekForGeeks" )
root.geometry( '350x200' )
lbl = Label(root, text = "Are you a Geek?" )
lbl.grid()
def clicked():
lbl.configure(text = "I just got clicked" )
btn = Button(root, text = "Click me" ,
fg = "red" , command = clicked)
btn.grid(column = 1 , row = 0 )
root.mainloop()
Output:
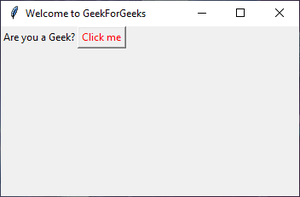
Button added
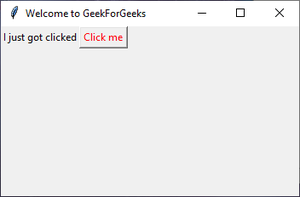
After clicking "Click me"
6. Using the Entry() class we will create a text box for user input. To display the user input text, we'll make changes to the function clicked(). We can get the user entered text using the get() function. When the Button after entering of the text, a default text concatenated with the user text. Also change button grid location to column 2 as Entry() will be column 1.
Example:
Python3
from tkinter import *
root = Tk()
root.title( "Welcome to GeekForGeeks" )
root.geometry( '350x200' )
lbl = Label(root, text = "Are you a Geek?" )
lbl.grid()
txt = Entry(root, width = 10 )
txt.grid(column = 1 , row = 0 )
def clicked():
res = "You wrote" + txt.get()
lbl.configure(text = res)
btn = Button(root, text = "Click me" ,
fg = "red" , command = clicked)
btn.grid(column = 2 , row = 0 )
root.mainloop()
Output:
Entry Widget at column 2 row 0
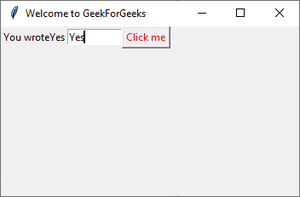
Displaying user input text.
7. To add a menu bar, you can use Menu class. First, we create a menu, then we add our first label, and finally, we assign the menu to our window. We can add menu items under any menu by using add_cascade().
Example:
Python3
from tkinter import *
root = Tk()
root.title( "Welcome to GeekForGeeks" )
root.geometry( '350x200' )
menu = Menu(root)
item = Menu(menu)
item.add_command(label = 'New' )
menu.add_cascade(label = 'File' , menu = item)
root.config(menu = menu)
lbl = Label(root, text = "Are you a Geek?" )
lbl.grid()
txt = Entry(root, width = 10 )
txt.grid(column = 1 , row = 0 )
def clicked():
res = "You wrote" + txt.get()
lbl.configure(text = res)
btn = Button(root, text = "Click me" ,
fg = "red" , command = clicked)
btn.grid(column = 2 , row = 0 )
root.mainloop()
Output :
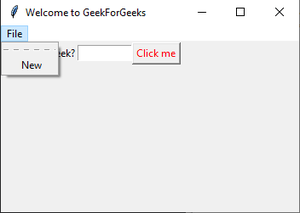
Menu bar
This simple GUI covers the basics of Tkinter package. Similarly, you can add more widgets and change their configurations as desired.
Widgets
Tkinter provides various controls, such as buttons, labels and text boxes used in a GUI application. These controls are commonly called Widgets. The list of commonly used Widgets are mentioned below –
| S No. | Widget | Description |
| 1 | Label | The Label widget is used to provide a single-line caption for other widgets. It can also contain images. |
| 2 | Button | The Button widget is used to display buttons in your application. |
| 3 | Entry | The Entry widget is used to display a single-line text field for accepting values from a user. |
| 4 | Menu | The Menu widget is used to provide various commands to a user. These commands are contained inside Menubutton. |
| 5 | Canvas | The Canvas widget is used to draw shapes, such as lines, ovals, polygons and rectangles, in your application. |
| 6 | Checkbutton | The Checkbutton widget is used to display a number of options as checkboxes. The user can select multiple options at a time. |
| 7 | Frame | The Frame widget is used as a container widget to organize other widgets. |
| 8 | Listbox | The Listbox widget is used to provide a list of options to a user. |
| 9 | Menubutton | The Menubutton widget is used to display menus in your application. |
| 10 | Message | The Message widget is used to display multiline text fields for accepting values from a user. |
| 11 | Radiobutton | The Radiobutton widget is used to display a number of options as radio buttons. The user can select only one option at a time. |
| 12 | Scale | The Scale widget is used to provide a slider widget. |
| 13 | Scrollbar | The Scrollbar widget is used to add scrolling capability to various widgets, such as list boxes. |
| 14 | Text | The Text widget is used to display text in multiple lines. |
| 15 | Toplevel | The Toplevel widget is used to provide a separate window container. |
| 16 | LabelFrame | A labelframe is a simple container widget. Its primary purpose is to act as a spacer or container for complex window layouts. |
| 17 | tkMessageBox | This module is used to display message boxes in your applications. |
| 18 | Spinbox | The Spinbox widget is a variant of the standard Tkinter Entry widget, which can be used to select from a fixed number of values. |
| 19 | PanedWindow | A PanedWindow is a container widget that may contain any number of panes, arranged horizontally or vertically. |
Geometry Management
All Tkinter widgets have access to specific geometry management methods, which have the purpose of organizing widgets throughout the parent widget area. Tkinter exposes the following geometry manager classes: pack, grid, and place. Their description is mentioned below –
| S No. | Widget | Description |
| 1 | pack() | This geometry manager organizes widgets in blocks before placing them in the parent widget. |
| 2 | grid() | This geometry manager organizes widgets in a table-like structure in the parent widget. |
| 3 | place() | This geometry manager organizes widgets by placing them in a specific position in the parent widget. |
How To Create Gui App In Python
Source: https://www.geeksforgeeks.org/create-first-gui-application-using-python-tkinter/
Posted by: grantficame.blogspot.com
0 Response to "How To Create Gui App In Python"
Post a Comment